Salesforce Commerce Cloud
About
Salesforce Commerce Cloud is a cloud-based ecommerce software that delivers a device-agnostic, personalized shopping experience to end consumers. Reach has developed the Reach LINK bundle to support price localization, tax calculation, and payment processing for certain SFCC storefronts.
The Reach LINK bundle provides access to Reach's international processing and localization for SCC B2C supported storefronts:
- Storefront Reference Architecture (SFRA)
- Legacy SiteGenesis JavaScript Controllers (SGJC)
Credentials are required to use the Reach bundle. To start the process you can apply for a Reach account or contact Sales. For technical questions contact [email protected] or visit support.withreach.com.
Bundle Structure
The bundle consists of three independent functional components:
The code is structured in three cartridges to support both SFRA and SGJC:
- bc_reach - required for both SFRA and SGJC storefronts
- int_reach - only for legacy SGJC storefronts
- int_reach_sfra - only for SFRA storefronts
For SFRA use: bc_reach + int_reach_sfra for SGJC use: bc_reach + int_reach
Workspace Setup
All three cartridges are separate Eclipse projects.
It's a 5 step process to add these cartridges to your workspace.
Step 1
In Eclipse: File > import > Existing Projects into Workspace
Step 2
Select the directory where you've checked out the LINK Reach repository.
Step 3
It will find and show three projects: bc_reach, int_reach, int_reach_sfra.
Step 4
Select the cartridges for your storefront version.
a. SFRA select: bc_reach + int_reach_sfra
b. SGJC select: bc_reach + int_reach
Step 5
Click Finish.
To allow Eclipse to upload the cartridges automatically, select Yes when Eclipse offers to link the projects to your active server connection.
Build
SFRA
The Reach cartridge build inherits and follows the SFRA build. Open a terminal in the root directory of the LINK Reach repository and:
- Install node modules:
npm install - Compile static resources:
npm run compile:js && npm run compile:scss
SGJC
SiteGenesis expects changes to be applied directly to the existing cartridge code and there is not a separate build process.
Code changes for SGJC are prepared as a git diff file against SiteGenesis v104.1.0.
- Run
git apply link_reach.diffto apply and stage all changes.
a. Run this command in the directory with thelink_reach.diffpatch file.
a. More information on applying git diffs can be found here. - Review the changes to ensure no custom frontend cartridges are being overridden.
- Commit the changes.
Re-run your existing SGJC build with Grunt or Gulp. For more details see: SGJC Setup.
Upload
Upload the two Reach cartridges required for your storefront version to your server. More detail can be found here: SFRA Upload.
Eclipse Studio
If you are using Eclipse and have the projects linked to your active server the code will be automatically uploaded. To force everything to be re-uploaded run: Project > Clean.
Command Line
In the LINK Reach repo root folder:
- Edit
dw.jsonfile to enter the needed connection information. - Run:
npm run uploadCartridge
Add to Cartridge Path
SFRA
Add int_reach_sfra:bc_reach right before the storefront cartridge.
SGJC
Add int_reach:bc_reach right before the storefront cartridge.

SFRA sample cartridge path.
Import Metadata
Metadata is imported to generate all required services, profiles and credentials in the business manager. Metadata and site configurations are located in the /metadata directory in the site template format.
- In the Reach LINK repository, in
/data/site_template - In
site_template/sites/rename theRefArchfolder to your site name.
a. Ex. If your site isMyCoolStorerename the folder tosite_template/sites/MyCoolStore/ - Zip
site_templatefolder. - From Business Manager upload and import
site_template.zip
a.Administration > Site Development > Site Import & Export
b. Choose File:site_template.zip> Upload > Import.
Configure Service Profiles
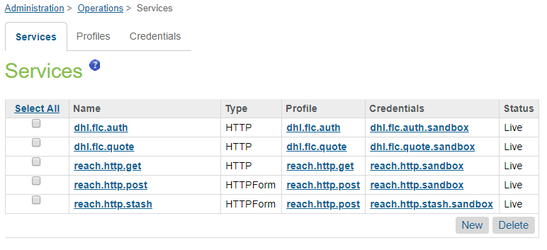
In the Business Manager there are two DHL FLC services and three Reach services: Administration > Operations > Services

There are eight profiles in total for both Production and Sandbox environments:

For each profile configure the account credentials received by Reach and DHL.
- User: Reach MerchantId or DHL Client Id
- Password: Reach Secret or DHL Client Secret
Service profiles are configured with sandbox values by default and should be reviewed by the Merchant's SI before go live.

Switching between Sandbox and Production environments is done from the component's custom site preferences, in theEnable Sandbox Modeconfiguration setting.
Updated 7 months ago
