Shopify
The Reach Shopify Apps (Reach Localize and Reach Currency) enable Shopify merchants to make their business globally accessible by allowing their store to handle global transactions.
The Apps allow shoppers to purchase in their local currencies through a single Shopify store using Shopify's native checkout.
What do the Reach Shopify Apps do?
- Support multiple currencies in one store
- Integrate directly into Shopify's native checkout
- Allow shop owners to set up variant-specific fixed pricing rules
- Allow shop owners to set up rounding rules for currency conversions
- Support over 100 different currencies
- Enable access to Reach's many alternative payment methods at checkout
Getting Started
In order to use the Reach Shopify solution effectively, we're going to guide you through some of the questions and topics you need to think about when you're installing the app.
- Step 1. Install the Reach Shopify Apps
- Step 2. Set Up Your Store
- Step 3a. (Optional) - Vanity Pricing
- Step 3b. Cart Template change
- Currency Selector
Supported Browsers
We currently support all the browsers that Shopify officially supports.
Support
Please reach out with any questions! We're here to help.
Step 1 - Install the Reach Shopify Apps
Contact Reach Support for install links
You will need to install 2 apps
- Reach Payment Gateway
- Reach Currency App
Step 2 - Setting Up Your Store
Once the Reach Localize Apps are installed on your store, use the information on this page to help you guide you through the setup.
Here's an overview of what you'll need to do to set up your store:
- Update your currency settings in Shopify
- Verify that the update took effect by looking at the "Money" attribute in your code
- Add the Reach Checkout additional script
- Create the Reach Script Snippet
- Update theme.liquid and Checkout.liquid
That's it!
You can optimize your Reach Script further using some of the attributes available.
Currency Settings
- From Shopify's admin, select Settings and then Store details
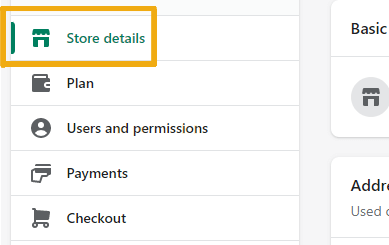
- Scroll down to the Store Currency section, click Change formatting

- Update the HTML with/without currency "span" tag to include class="money" span as shown below
Here's an example:
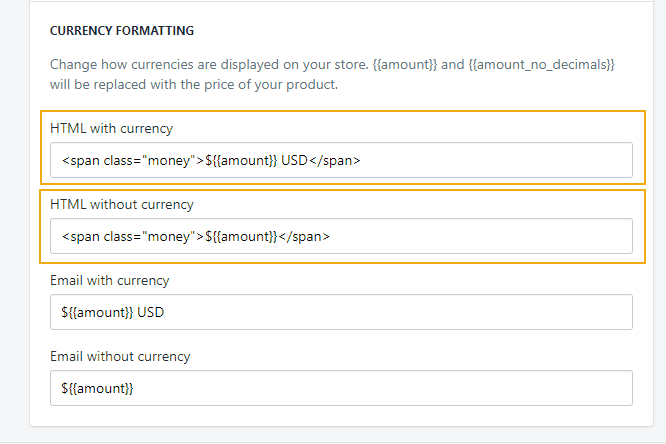
To be safe, ensure the use of quotes or other symbols '<${" etc. doesn't affect the current theme by making this change then checking a preview of your theme for any console errors.
Verify Money Tags
Verify that the update you did in the "span" class in the last step has taken effect. Do this by double checking in your code that all money values are rendered with the | money filter.
Here's an example that shows | money is correctly showing up in the code.
<span>{{ product.price | money }}</span>
To make sure that the price conversions are done correctly, the class="money" must be within every that involves a price that needs to be converted on your store.
Reach Checkout Additional Scripts
- From Shopify's admin, click settings and then Checkout
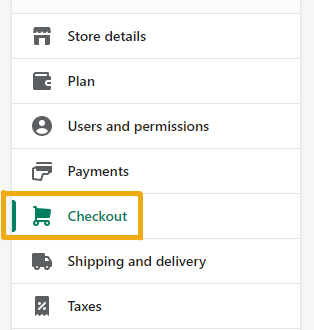
- Scroll down to Additional scripts, add the Reach script in the text box available.
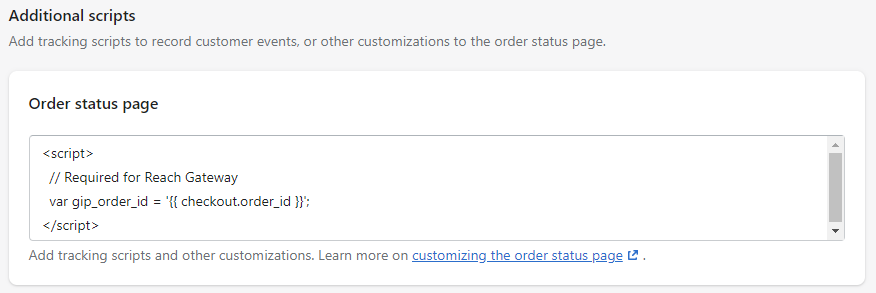
Here is the code to add to the Additional scripts section.
<script>
  // Required for Reach Gateway
  var gip_order_id = '{{ checkout.order_id }}';
</script>
Create the Reach Script Snippet
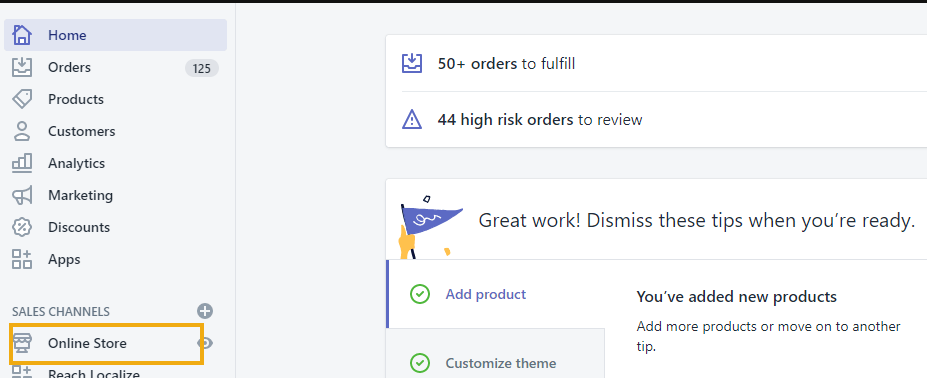
- From Shopify's admin, select Online Store.
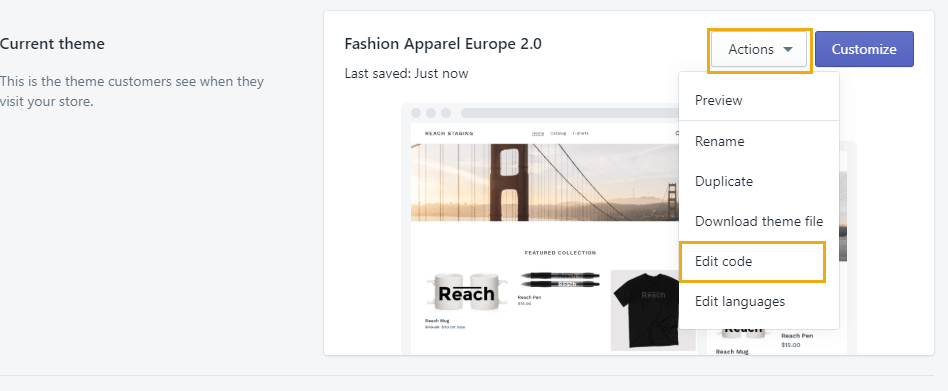
On the theme you want to install Reach script, select Actions and then Edit code.

- Under "Snippets", click "Add a new snippet"
Enter the desired snippet name, we recommend "reach-script", click Create Snippet to create the snippet.
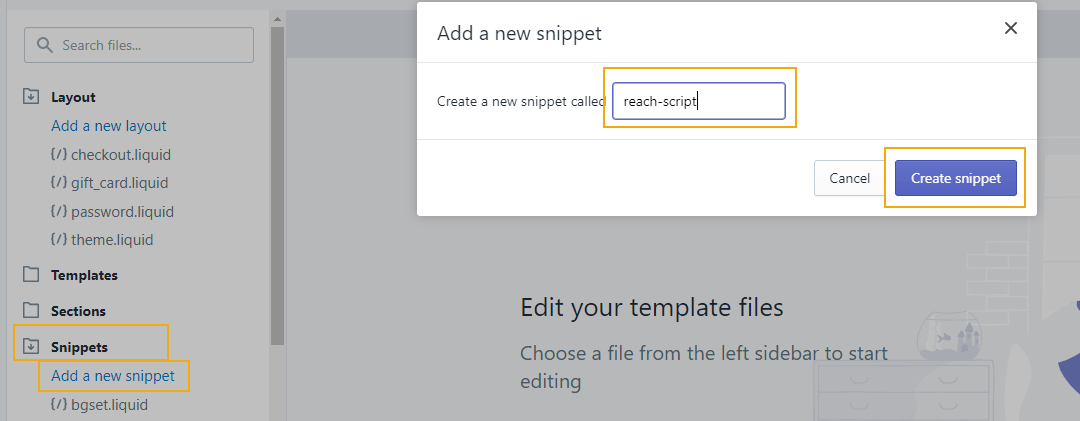
- Update the "reach-script.liquid" with your customized Reach code.
{Merchant Id} should be replaced with your Reach Merchant Id, kindly reach out to us for your valid Merchant Id.
You can create your custom code here My Shop's Custom Code
<!-- Reach Localize Script -->
<script
   id="gointerpay_localize"
   src="https://assets.rch.io/{Merchant Id}/localize.js"
   data-merchant_id="{Merchant Id}">
</script>
Update theme.liquid and checkout.liquid
- From Shopify's admin, navigate to your theme codes

- Under "Layouts", find your theme.liquid and checkout.liquid
Note: If your checkout.liquid doesn't exist, you can create it.
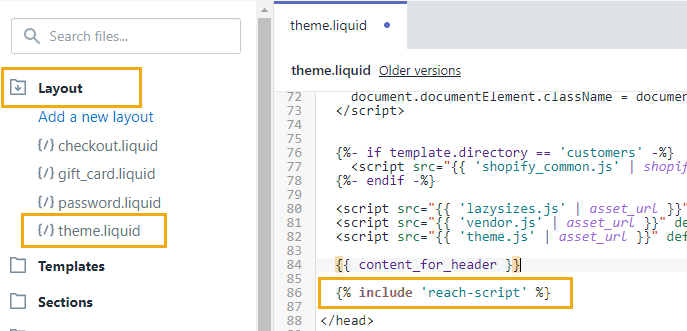
Copy and paste the code below into your theme.liquid and checkout.liquid just before the .
{% include 'reach-script' %}
Script Tag Options
To further customize your shop's code, you can use the attributes described below.
| Attribute | Required | Value |
|---|---|---|
| id | Yes | 'gointerpay_localize' |
| src | Yes | Localize.js script source |
| data-merchant_id | Yes | Your Merchant ID |
| data-store_currency | No | The store currency. Defaults to 'USD' if omitted. Set to the 3-char currency code for all other currencies. |
| data-process_store_currency | No | Set to 'true' if Reach will process store currency orders. Reach payment methods will be shown for all currencies including the store currency. Shopify payment methods will always be hidden unless the 'data-whitelisted_store_currency_gateways' flag is used. |
| data-whitelisted_gateways | No | A comma separated list of Shopify gateway codes. Each gateway included will be enabled for localized orders. See Gateway Codes below for more information. |
| data-whitelisted_store_currency_gateways | No | Used together with the 'data-process_store_currency' attribute. A comma separated list of Shopify gateway codes. Each gateway included will be enabled for store currency orders if 'data-process_store_currency' is also set to true. See Gateway Codes below for more information. |
| data-env | No | Script environment. Defaults to 'production' if omitted, which will use production APIs. Set to 'sandbox' or 'development' when using the corresponding MIDs/API. See Environments below for more information. |
| data-flc_only | No | Set to 'true' if only Reach DHL app functionality is required. Will disable price conversion and payment processing functions. |
| data-currency_tag | No | This flag can be used to force a shop's visitors to re-localize (clear their cached currency) once every time a new value is set. The value can be any alphanumeric string. |
| data-disabled_countries | No | A comma separated list of 2-character country codes. The script will be disabled if the shopper is localized to any of these countries. |
| data-auto_round_prices | No | This flag is used to enable automatic rounding on all prices across the store. |
| data-block_ga_crawlers | No | This flag is used to force web crawlers like Google crawlers to use store currency and remain undetected |
| data-hide_zero_decimal | No | Set to "true" to remove .00 from rounding values. Set to "false" if you want decimal .00 with your rounded prices. e.g. If set to "true" $35.00 CAD is displayed as $35 CAD |
Gateway Codes
| Gateway Code | Gateway |
|---|---|
| all | Using 'all' will override the specific gateway behaviour and show all gateways instead. |
| shopify | Shopify Payments |
| paypal | PayPal |
| cash | Cash on Delivery (COD) |
| bank | Bank Deposit |
| afterpay | Afterpay |
| afterpay_na | Afterpay North America |
| alma_fr_installment | Alma |
| amazon | Amazon Pay |
| chinapay | China Payments |
| clearpay**** | Clearpay |
| clearpay_eur**** | Clearpay EUR |
| clearpay_uk | Clearpay UK |
| klarna,klarna_v2 (Add both tags) | Klarna (English) |
| klarna_es | Klarna (Spanish) Use the following text in your label: Compra ahora, paga después con Klarna |
| klarna_fr | Klarna (French) Use the following text in your label: Acheter maintenant, payer plus tard avec Klarna |
| klarna_de_invoice | Klarna (German) Use the following text in your label: Rechnung mit Klarna |
| klarna_de_installment | Klarna (German) Use the following text in your label: Ratenkauf mit Klarna |
| klarna_de_immediately | Klarna (German) Use the following text in your label: Sofort bezahlen mit Klarna |
| klarna_it | Klarna (Italian) Use the following text in your label: Compra ora, paga dopo con Klarna |
| komoju_in_store komoju_transfer komoju_pay_easy | Komoju |
| laybuy | Laybuy |
| money_order | Money Order |
| nihaopay | NihaoPay |
| paybright | PayBright |
| sezzle | Sezzle |
| splitit | Splitit Monthly Payments |
| spotii | Spotii Use the following text in your label: Spotii - Pay in 4 instalments Cost-Free ◉◎◎◎ قسطها على 4 دفعات مجاناً |
| tabby | Tabby |
| wechatpay | WeChatPay |
| zip | Zip - Pay in 4 (Quadpay) |
Environments:
Uninstall conflicting apps from your store
Uninstall conflicting apps from your store
Reach Localize is powerful but not powerful enough to work accurately when there are conflicting apps already installed in your store. If you have apps that fall under the categories below, kindly uninstall them or stop them before completing your Reach Localize customization.
- All currency customization apps installed on your store
- Any Geo location apps
- Shopify Multi Currency
Step 3a. - Vanity Pricing
"Vanity Pricing" or "rounded pricing" is a way for you to control how your prices are displayed to your shoppers.
The Reach Vanity Pricing functionality allows shop owners to convey value and motivate customers with specific rounding or display rules attached to their prices.
Before you start
Make sure you reach out to your Reach Account Manager to discuss your rounding rules, fixed foreign pricing, charm values, and discounted sale pricing.
Add Auto Rounding to my prices
First, ensure that your currency settings is updated as recommended here https://docs.withreach.com/docs/setup#section-currency-settings
Then, with the attribute data-auto_round_prices="true" added to your "reach-script", you should be able to have all prices within your website rounded.
Note: cart pages require special attributes, check here for cart integrations
<!-- Reach Localize Script -->
<script
   id="gointerpay_localize"
   src="https://assets.rch.io/{Merchant Id}/localize.js"
   data-merchant_id="{Merchant Id}"
   data-auto_round_prices="true">
</script>
Disable Rounding Tag
For prices you do not want rounded after using the attribute above, you can add the data-variant-id="noround" within the tag of the price you don't want to round.
Product and Variant Tags
If you cannot for any reason do auto rounding for your store then you would have to do the vanity task manually by following the steps below.
In order to vanitize product pricing properly the Reach code needs to know what prices should be converted for the different variant product options.
These edits are usually made in the collection.liquid and product.liquid files but your store may have other places where the span.money tag exists.
Add data-product-id and data-variant-id attributes to the parent of any span.money tags for a product in your .liquid code.
- For any secondary prices such as sale prices, append a suffix to the data-variant-id with the format
<variant_id>:<text>where text can be an identifier of your choosing.
<div data-product-id="{{ product.id }}"
     data-variant-id="{{ product.selected_or_first_available_variant.id }}">
    {{ product.price | money }}

// Sale prices
<div data-product-id="{{ product.id }}"
     data-variant-id="{{ product.selected_or_first_available_variant.id }}:compare">
    {{ product.compare_at_price | money }}
product.liquid
In product.liquid, add the data-gip-product-variant-select attribute with product ID as the value to the variant element if a product has multiple variants.
<select data-gip-product-variant-select="{{ product.id }}">
  ...
Make sure that this change doesn't affect the selectCallback javascript function, which is sometimes used for switching between variants.
function selectCallback(variant, selector) {
    var $price = $('span.money');
    ...
}
Step 3b. - Cart Template changes
The following section is for preparing your cart page or flyout carts for vanity pricing. For flyout carts or any additional carts there are extra steps required which are outlined below under Additional Carts
Main Store Cart (/cart)
- Login to Shopify's admin, select Online Store.
- Select Actions and click on Edit Code
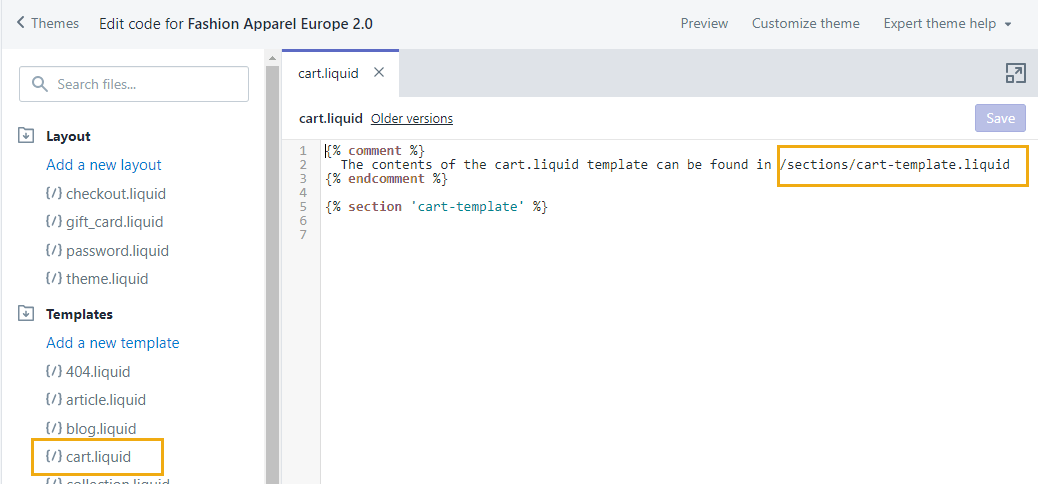
- Under "Templates", select cart.liquid.
Note: In some themes, this may be located under "Sections" in the cart-template.liquid file as shown in the first line of the cart.liquid shown below
- Finally, make customized changes to your cart pages using the information and attributes below
In order to convert prices to the consumer currency, elements with prices in the cart page will need to be tagged with these classes:
| Class | Location | Notes |
|---|---|---|
| gip-cart | parent element of the cart line items | There can only be one element on the page with this class or else the cart will not be valid. |
| gip-cart-line-item | main line item element |
The gip-cart is needed within a cart body while the gip-cart-line-item needs to be included within the line-item loop of the cart.
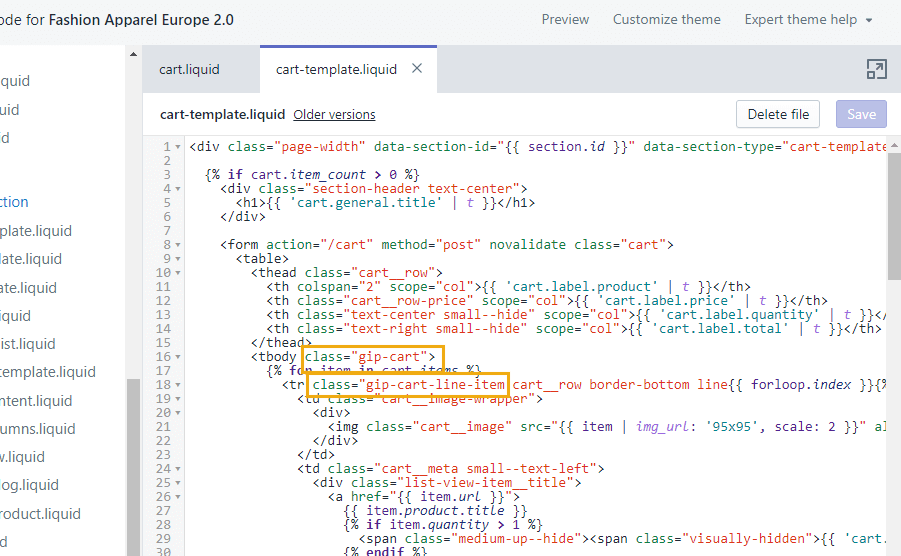
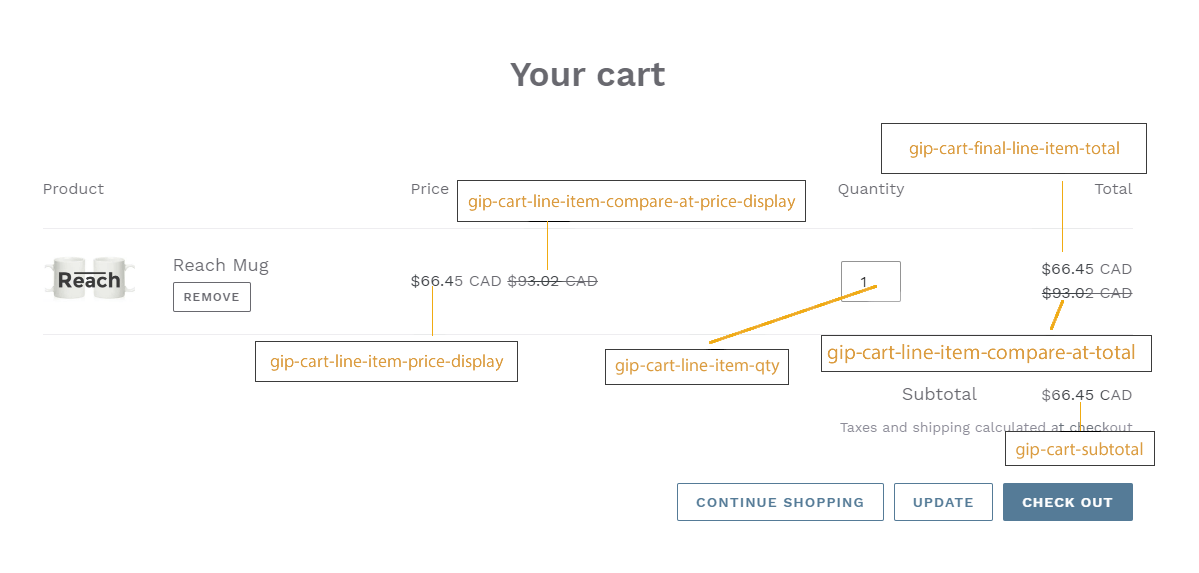
Most carts includes product price, compare_at_prices, quantity, final line item prices, subtotals and sometimes total depending if there are discounts or not. an example set of attributes are shown below.
If these cart elements exist in your cart.liquid page, you will need to add the corresponding classes to overwrite any existing inner html content with the converted prices. If no conversion is happening then the inner html content will be untouched.
| Add Cart | To the Cart Element | Notes |
|---|---|---|
| gip-cart-subtotal | non-discounted subtotal | |
| gip-cart-discounted-subtotal | discounted subtotal from discounts, auto discounts, and script discounts | |
| gip-cart-total-discounts | total discounts amount from discounts, auto discounts, and script discounts | |
| gip-cart-additional-fee | additional fees | The amount must be contained in a child span.money element and these fees will be added to the cart total.<h3 class="gip-cart-additional-fee"><span class="money">$123.45</span></h3> |
| gip-cart-total | cart total |
Line Item Optional Classes
Within the line item itself you will need to do some or all of the following steps depending on your store:
- Add gip-cart-line-item-qty class to the line item element that contains the quantity amount. Make it non-editable if you have an Update Cart button.
// For carts with an editable quantity and an update cart button,
// create a new hidden span:
<span class='gip-cart-line-item-qty' style='display:none;'>{{ line_item.qty }}</span>


// For carts that use Ajax to update the quantity immediately add
// the 'gip-cart-line-item-qty' to the existing element:
<input type='text' class='gip-cart-line-item-qty'/>
- Create a hidden span with class gip-cart-line-item-price and product/variant ID attributes and create a child element span.money with the original (non-discounted) item price.
<span class="gip-cart-line-item-price"
    style="display:none;"
    data-product-id="{{ line_item.product_id }}"
    data-variant-id="{{ line_item.variant_id }}">
    {{ line_item.original_price | money }}
</span>
- Create a hidden span with class gip-cart-line-item-meta and the attributes data-original-price-cents and data-discounted-price-cents
<span class="gip-cart-line-item-meta"
    style="display:none;"
    data-original-price-cents="{{ line_item.original_price }}"
    data-discounted-price-cents="{{ line_item.discounted_price }}">
</span>
- Create spans with class gip-cart-line-item-discount and attribute data-discount-title for each Shopify Script line item discount. This is only necessary if you use scripted discounts.
{% for discount in line_item.discounts %}
    <span class="gip-cart-line-item-discount"
    data-discount-title="{{ discount.title }}"></span>
{% endfor %}
Optional If you are using the gip-cart-line-item-compare-at-price-display or gip-cart-line-item-compare-at-total classes to display compare at prices, you will additionally need to add this:
<span class="gip-cart-line-item-compare-at-price"
    style="display:none;"
    data-product-id="{{ line_item.product_id }}"
    data-variant-id="{{ line_item.variant_id }}:compare">
    {{ variant.compare_at_price | money }}
</span>
Optional Classes
If these line item elements exist in your cart.liquid page, you will need to add the corresponding classes to overwrite any existing inner html content with the converted prices. If no conversion is happening then the inner html content will be untouched.
| gip-cart-line-item-price-display | non-discounted unit price |
| gip-cart-line-item-compare-at-price-display | unit "compare at" price |
| gip-cart-line-item-discounted-price-display | discounted unit price from discounts, auto discounts, and script discounts |
| gip-cart-line-item-final-price-display | final unit price |
| gip-cart-line-item-total | non-discounted line total |
| gip-cart-line-item-compare-at-price-total | line "compare at" total |
| gip-cart-discounted-line-item-total | discounted line total from discounts, auto discounts, and script discounts |
| gip-cart-final-line-item-total | final line total |
Additional Carts
For any additional carts, like popup carts, you will need to do all of the same changes for the main cart for your other carts. In order to differentiate the carts use this class name structure gip-secondary-cart-* where '*' is the rest of the class name from above.
For example, if on the cart page you had gip-cart-line-item, for the popup cart you would use gip-secondary-cart-line-item for that element.
Fly-Out (Popup) Cart
Most stores have more than one(1) cart, If you have used the above configurations for the main cart and you have a popup cart. We shall consider this your secondary cart. Thus, doing what we have done with the main cart above using gip-cart classes, we would do the same for the popup cart using gip-secondary-cart classes.
An example of a popup cart is shown below with the appropriate gip-secondary-cart classes used.
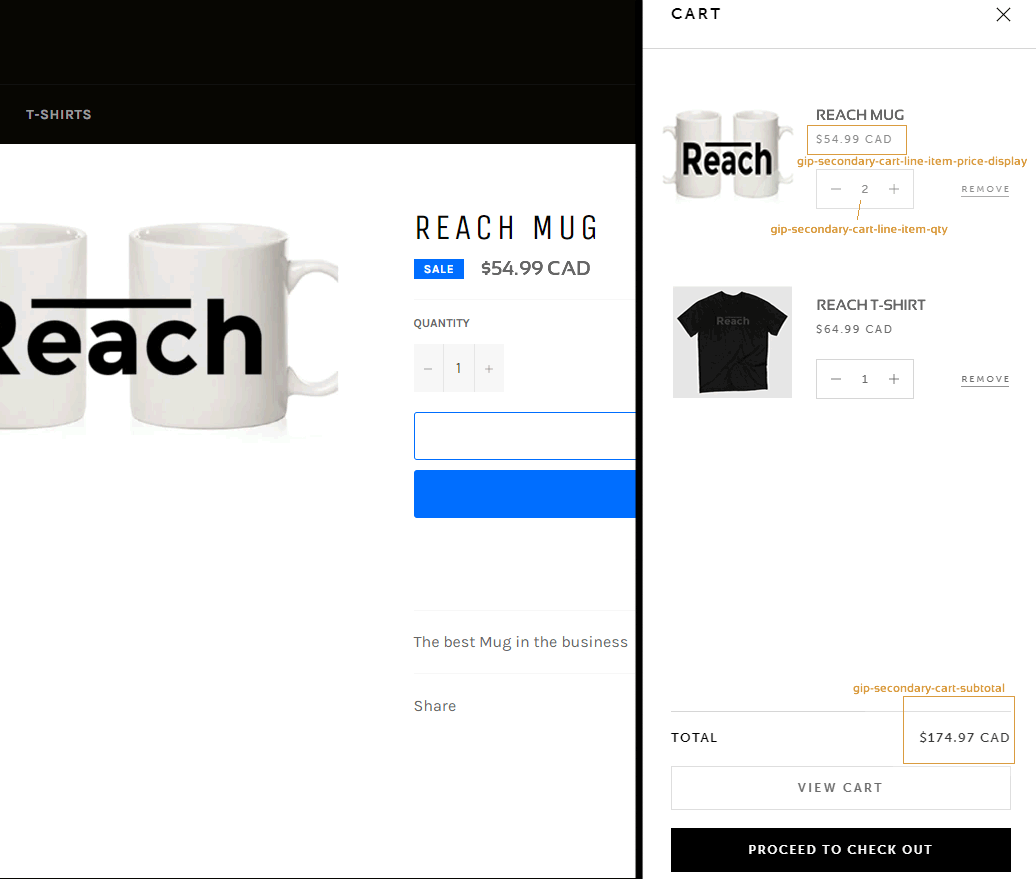
If your store has more than 2 carts e.g an extra mobile cart or re-usable cart codes, then it is time to use the gip-extra* attribute classes as described below.
*It is very important that all carts when displayed on the store do not have duplicated cart attributes.
If your store has more than just the basic cart and popup cart you may use these class prefixes as well for those carts:
- gip-extra-cart-*
- gip-extra2-cart-*
Apply Utility Classes
Optional Add gip-convert-hide or gip-convert-display-none to set opacity to 0 or set display to 'none' respectively, if certain elements should be hidden permanently when currency conversion is running. Elements will be displayed if currency conversion is disabled (ie. domestic localize).
Optional Add gip-extra-discount-display class to any elements that display the discount amount (from percentage or flat discount codes only) in checkout. This could be used for custom messages detailing how much was discounted. Checkout pages only.
Currency Selector
The Reach Currency Selector allows your shoppers to control the currency in which they shop at your store, regardless of geolocation.
The currency selector is an optional feature; it will not affect anything else if omitted.
Add the currency selector to Sections > footer.liquid
<select class="gip_currency_select">
  <option value="GBP">British Pounds</option>
  <option value="CAD">Canadian Dollars</option>
  <option value="USD">US Dollars</option>
  <option value="EUR">Euro</option>
  <option value="-1" class="gip_currency_select_local">(local)</option>
</select>
- Each option should contain the Reach currency code as the value, but the text can be anything.
- There must be an option for the store base currency.
- There must also be an option with a value of
-1which will be used for the automatically detected currency if it is not already on the list. If custom text is required for this option, theid="gip_currency_select_local"can be removed to achieve this.
Custom Currency Selector
If you are utilizing your own currency selector there are some optional classes that may help you.
- You may add the class
gip-currency-select-textto any element that should display the current currency code. - You may add the class
gip-currency-classto any element that you would like to style according to the currency selected. The script will automatically add an additional 'gip-currency-class-{current currency}' class to that element.- For example, if the selected currency is "USD" then the added class will be `gip-currency-code-usd
Updated 10 months ago
