Drop-In
The Drop-In payment solution is a fast and secure way to accept payments online without the need for extensive front-end development work. With just a single embedded iframe you can automatically display and accept payment methods from around the world.
Drop-In Features
Local currency advantage: Access to the best wholesale FX rates
Multiple payment methods: Supports multiple international payments methods
Reduced card friction: Real-time card validation, number masking, and inline error messaging
Mobile-ready: Fully responsive design
International: Supports 36 languages
Style customization: Customizable colors, borders, and fonts
3D Secure: Supports 3D Secure
Fraud and compliance: Multi-factor fraud system, and PCI DSS Level 1 compliance
Integration Information
- The shopper initiates a checkout.
- When the shopper clicks to proceed to payment, your server sends a request to the Session API to create a new Session object. A Session object is returned and contains a Session ID.
- The Drop-In is instantiated in the shopper's browser using the rch.js library and the Session ID.
- The shopper selects a payment method and fills out the payment details to complete the checkout.
- Reach will notify your server when the Session is COMPLETED. The notification contains the Order's ID.
- Finally, Reach will notify your server of each Order state change until an order is PROCESSED.
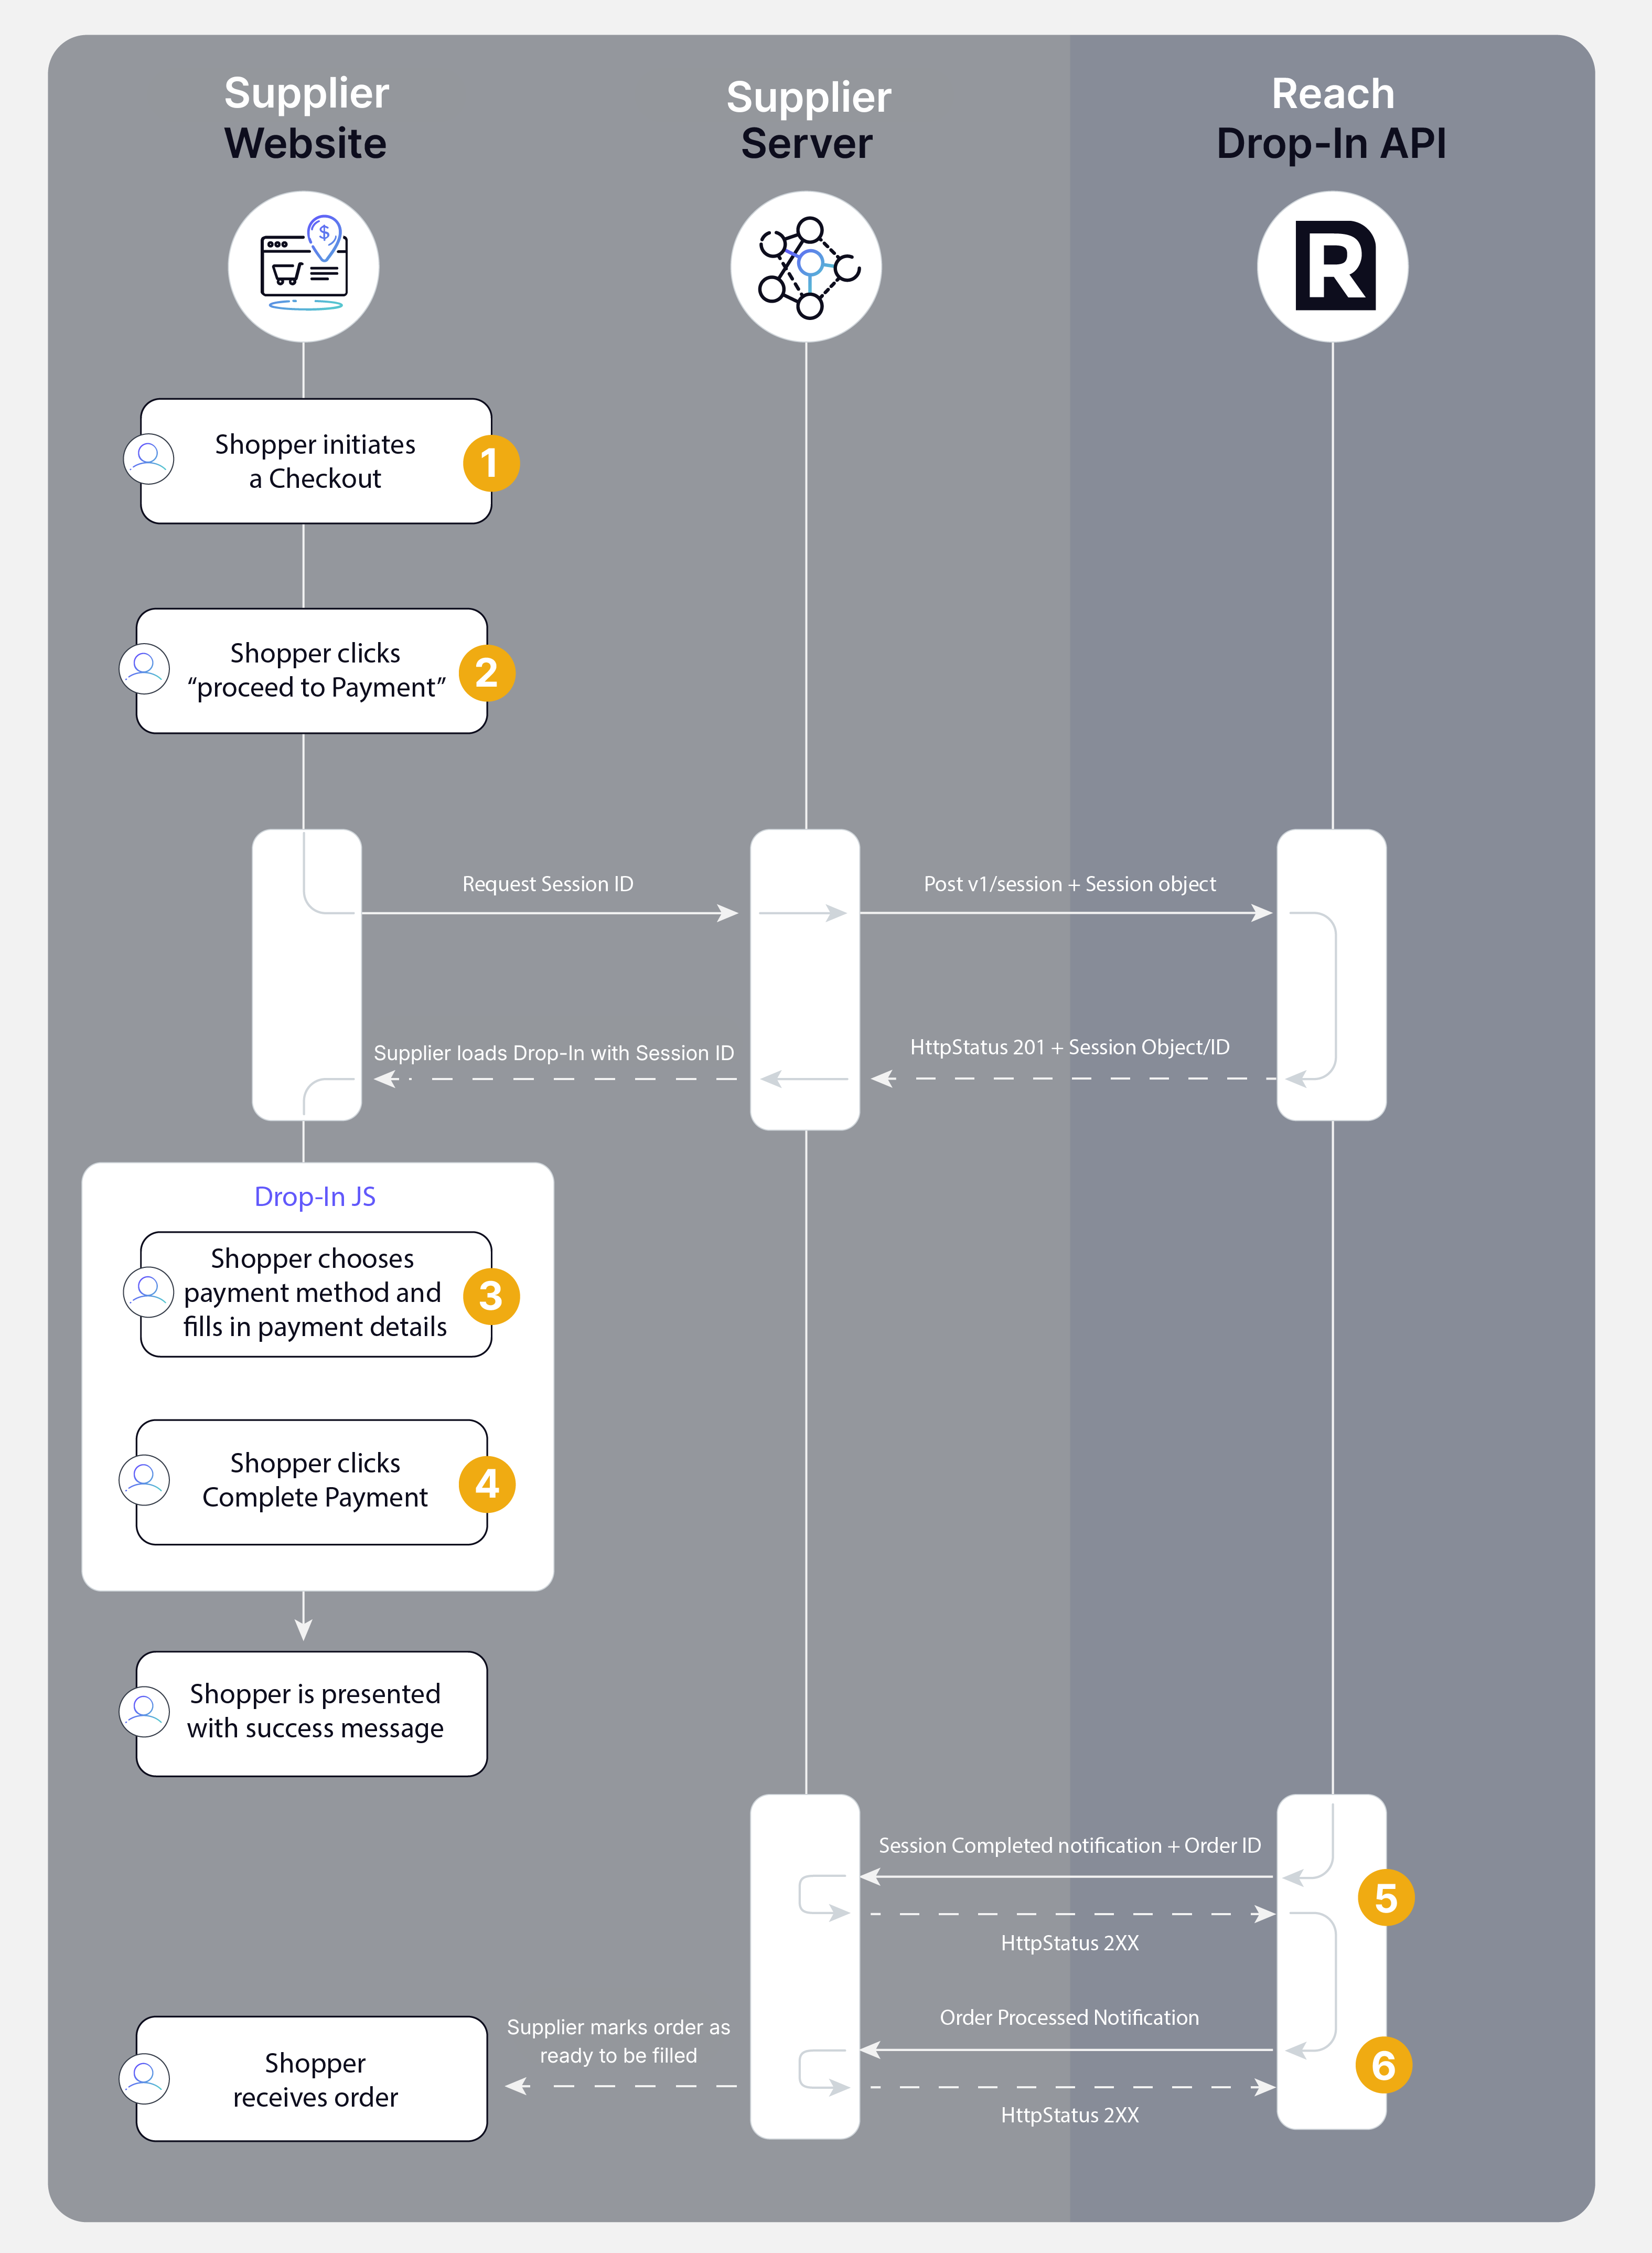
Drop-in Payment Flow Diagram
Getting Started
Authentication
Requests made to the Session API and the Order API are authorized using HTTP Basic Authorization. The API username and password supplied to you by Reach are used to create the Authorization header key/value pair.
Example
If your username is "account" and password is "secret" the base64-encoded value of account:secret is the string value "YWNjb3VudDpzZWNyZXQ=".
The Basic Authorization header for requests to the API would be Authorization:
Basic YWNjb3VudDpzZWNyZXQ=
Warning
Your API credentials carry many privileges so be sure to keep it secure! Do not share your API password in publicly accessible areas such as GitHub, client-side code, and so forth.
The API requires that all requests are made over a secure TLS 1.2 connection.
Step 1: Get FX Rates
To get a list of rates, you will simply send an HTTP GET request to the getRates
API. The getRates
API will then respond with either Guaranteed or Spot Rates depending on how your Reach account in configured.
Localization and getRates
Reach's FX solution supports local processing of payments in 100+ currencies, allowing you to dynamically display local currency based on your customer’s location.
Understanding getRates
- The merchant sends a
getRates
request to thegetRates
API. - The
getRates
API will respond with a the full list of the currencies and their FX rates that are enabled in your Reach account. - The merchant displays a currency selector utilizing the
getRates
response details. - The shopper selects their preferred currency on the merchant's website.
- The merchant calculates and displays the prices in the Shoppers local currency.
Request Example
GET https://api.sandbox.withreach.com/v2.2/getRates?merchantId=yourMerchantId
Spot Rates
If your merchant account is configured for spot rates, then the response to getRates
will include only a Currency code and an indicated Rate.
Response Example
{
"Rates": [
{
"Currency": "ZMW",
"Rate": 13.059026
},
{ "Currency": "ZAR",
"Rate": 15.326697
},
]
}
Note
The rate indication is only used to approximate the converted prices based on current market rates. When the transaction goes through, the foreign exchange rate used to settle the transaction may be slightly different than the indication rate returned in
getRates
depending on market fluctuations.
Guaranteed Rates
If your merchant account is configured for guaranteed rates then the response to getRates
will include the Currency Code, the Rate ID, Expiry Date and a Rate that will be used when creating a session.
Response Example
{
"RateOffers": [
{
"Currency": "EUR",
"Id": "e3ac01e4-f48b-4f38-ba31-cd2bf51d61ba",
"Expiry": "2016-10-03T18:04:21.830514Z",
"Rate": 0.9349
},
{
"Currency": "CAD",
"Id": "8ca2b5a3-8120-4238-88ff-8811223aaef8",
"Expiry": "2016-10-03T18:04:21.524409Z",
"Rate": 1.3842
}
]
}
Saving Rate Offers
Rate offers typically expire 24 hours after they have been created with longer expiry times available in special circumstances. We recommend that
getRates
be called a couple of times per day for a better user experience which means it's possible to have multiple, non-expired rate offers. In that case, the latest rate offer should be used for new visitors.
How to utilize your Guaranteed Rate (Optional)
To guarantee your exchange rate, pass along the RateOfferId from the response when creating a session.
Create a Session with the RateOfferId - Example
POST /v1/session HTTP/1.1
Host: api.sandbox.withreach.com
Authorization: Basic YWNjb3VudDpzZWNyZXQ=
Content-Type: application/json
{
"MerchantReference": "unique_reference_provided_by_merchant",
"RateOfferId": "e3ac01e4-f48b-4f38-ba31-cd2bf51d61ba",
"Items": [
{
"Name": "Item 1",
"Amount": 10.0,
"Quantity": 1
},
{
"Name": "Item 2",
"Amount": 12.0,
"Quantity": 2
}
],
"BillingProfile": {
"Name": "First Last",
"Email": "[email protected]",
"Address": {
"Street": "123 Sreet",
"City": "City",
"Region": "AB",
"Country": "CA",
"Postcode": "X0X0X0",
"Phone": "4031234567"
}
},
"ShippingDetails": {
"ShippingAmount": 0.0,
"DutyAmount": 0.0,
"Name": "First Last",
"Email": "[email protected]",
"Phone": "4031231234",
"Address": {
"Street": "123 Sreet",
"City": "City",
"Region": "AB",
"Country": "CA",
"Postcode": "X0X0X0"
}
},
"AutoCapture": true,
"CompleteUrl": "https://www.send-user-here-after-success-redirect.com",
"CancelUrl": "https://www.send-user-here-after-failed-redirect.com"
}
Step 2: Create Currency Selector
Utilize the getRates
Currency response to create a currency selector for your shoppers.
Step 3: Calculate Prices
Utilize the getRates
response to calculate and display your product prices in the Shoppers local or preferred currency.
Capture Types
Drop-in supports both Auto and Delayed capture functionality.
With Auto Capture, funds are automatically captured from the transaction as soon as a Session is complete and an Order is created.
With Delayed Capture, the Order remains in an authorized state until you instruct Reach to capture the funds.
NOTE
Delayed Capture is designed for merchants that wish to wait until their product is ready to ship before processing the shopper's payment.
Option 1 - Auto Capture
By integrating using auto capture, you are instructing Reach to automatically capture the transaction funds as soon as the Session has created and authorized the Order
There are the 3 Steps to the Auto Capture implementation:
Step 1 - Create a Session
To create a Session, you will send an HTTP POST request to the Session API. To enable Auto Capture set the AutoCapture
boolean to true
. This can be verified with the AutoCapture
field in the response which should also be set to true
. See the Reach Session API Reference for more detailed look at the API.
Request Example
# Location
POST https://api.withreach.com/v1/session
#Headers
Authorization: Basic YWNjb3VudDpzZWNyZXQ=
Content-Type: application/json
#Body
{
"MerchantReference": "unique_reference_provided_by_merchant",
"Currency": "USD",
"Items": [
{
"Name": "Item 1",
"Amount": 10.00,
"Quantity": 1
},
{
"Name": "Item 2",
"Amount": 12.00,
"Quantity": 2
}
],
"BillingProfile": {
"Name": "First Last",
"Email": "[email protected]",
"Address": {
"Street": "123 Sreet",
"City": "City",
"Region": "AB",
"Country": "CA",
"Postcode": "X0X0X0",
"Phone": "4031234567"
}
},
"ShippingDetails": {
"ShippingAmount": 0.00,
"DutyAmount": 0.00,
"Name": "First Last",
"Email": "[email protected]",
"Phone": "4031231234",
"Address": {
"Street": "123 Sreet",
"City": "City",
"Region": "AB",
"Country": "CA",
"Postcode": "X0X0X0"
}
},
"AutoCapture": true,
"CompleteUrl": "https://www.send-user-here-after-success-redirect.com",
"CancelUrl": "https://www.send-user-here-after-failed-redirect.com"
}
Response Example
#Headers
Content-Type: application/json
#Body
{
"SessionId": "91b64778-0d37-479c-ae9f-32f6685ac6ea",
"State": "CREATED",
"MerchantReference": "unique_reference_provided_by_merchant",
"Items": [
{
"Name": "Item 1",
"Amount": 10.00,
"Quantity": 1
},
{
"Name": "Item 2",
"Amount": 12.00,
"Quantity": 2
}
],
"Currency": "USD",
"TotalAmount": 34.00,
"BillingProfile": {
"Name": "First Last",
"Email": "[email protected]",
"Address": {
"Street": "123 Sreet",
"City": "City",
"Region": "AB",
"Country": "CA",
"Postcode": "X0X0X0",
"Phone": "4031234567"
}
},
"ShippingDetails": {
"ShippingAmount": 0.00,
"DutyAmount": 0.00,
"Name": "First Last",
"Email": "[email protected]",
"Phone": "4031231234",
"Address": {
"Street": "123 Sreet",
"City": "City",
"Region": "AB",
"Country": "CA",
"Postcode": "X0X0X0"
}
},
"AutoCapture": true,
"CompleteUrl": "https://www.send-user-here-after-success-redirect.com",
"CancelUrl": "https://www.send-user-here-after-failed-redirect.com"
}
Step 2 - Instantiate the Drop-In
To instantiate the Drop-In, there are four main components:
- Add an HTML container element to your page to hold the Drop-In
- Create a JavaScript method to complete logic once the Drop-In is successful
- Create a JavaScript method to handle failure cases if payment is not successful
- Add the Drop-In (rch.js) script to your page
- Call the Reach
init()
method and pass in an object with atarget
,id
,onSuccess
, andonFailure
property.
View the Drop-In Javascript Library (rch.js) Guide for more detailed information about the rch.js
file.
Putting this all together your page should look something like this:
<!DOCTYPE html>
<html lang="en">
<head>
...
...
<script defer src="https://asset.withreach.com/dist/rch.js" onload="init()"></script>
<script>
function onSuccess() {
<!-- Perform any actions after the Drop-In is completed (i.e. redirect to success URL). -->
window.location.replace("/success/");
}
function onFailure(error) {
<!-- Perform any actions to handle payment failure. -->
document.querySelector("#message").innerHTML =
"Oops! Something went wrong. More information: " + error.errorCode +
", " + error.errorMessage + " Please review your information.";
}
function init() {
<!-- 91b64778-0d37-479c-ae9f-32f6685ac6ea is the session ID -->
RCH_CC.rchInit({target:"#rch-dropin",id:"91b64778-0d37-479c-ae9f-32f6685ac6ea", onSuccess, onFailure});
}
</script>
...
...
</head>
<body>
...
...
<div id=”rch-dropin”></div>
...
...
</body>
</html>
The onSuccess
method passed into the init
method is used to indicate that the payment has been successfully initiated and the shopper can now be directed to the success page.
NOTE
The
onSuccess
method does not indicate that the payment was completed only that the payment process has been successfully initiated. The payment is not complete until you’ve receive theORDER_PROCESSED
notification.
The onFailure
method passed into the init method is called when an error that is unrecoverable inside the session is encountered. The error code and message will be passed into onFailure
and can be used to determine which action to take. For example, a message could be displayed to the end-user indicating what failed.
Step 3 - Receive Notifications
The Drop-In will send notifications to you when actions are taken against a Session or Order. In order to receive these notifications, you will need to configure your server to listen for them by creating an endpoint at the webhook URL provided to Reach during onboarding. See the Notifications Guide for more details.
If the Order is processed successfully, you will receive the SESSION_COMPLETED
, ORDER_AUTHORIZED
, and ORDER_PROCESSED
notifications. Once you’ve received the ORDER_PROCESSED
notification the payment is considered complete.
NOTE
In the case of auto capture, the
SESSION_COMPLETED
andORDER_AUTHORIZED
notifications should be logged but not actioned on.
The ORDER_PROCESSED
notification will look like:
{
"EventType": "ORDER_PROCESSED",
"Order": {
"OrderId": "cc7236aa-d11b-436c-a29c-d26cecadc847",
"State": "PROCESSED",
"MerchantReference": "unique_reference_provided_by_merchant",
"SessionId": "91b64778-0d37-479c-ae9f-32f6685ac6ea"
}
}
Upon successfully receiving a notification you should respond with HTTP status 200. If you reply with a status outside that range, we will resend the notification at a later time. See the Notifications Guide for more details.
Option 2 - Delayed Capture
By integrating using delayed capture, the Order remains in an Authorized state until the you instruct Reach to capture the funds via an API request to the Order API.
There are 5 Steps to the Delayed Capture implementation:
Step 1 - Create a Session
To create a Session, you will send an HTTP POST request to the Session API. To disable Auto Capture, set the `AutoCapture` boolean to `false`. This can be verified with the `AutoCapture` field in the response which should also be set to `false`. See the [Session API Reference](/reference/createsession-2) for more details.Request Example
# Location
POST https://api.withreach.com/v1/session
#Headers
Authorization: Basic YWNjb3VudDpzZWNyZXQ=
Content-Type: application/json
#Body
{
"MerchantReference": "unique_reference_provided_by_merchant",
"Currency": "USD",
"Items": [
{
"Name": "Item 1",
"Amount": 10.00,
"Quantity": 1
},
{
"Name": "Item 2",
"Amount": 12.00,
"Quantity": 2
}
],
"BillingProfile": {
"Name": "First Last",
"Email": "[email protected]",
"Address": {
"Street": "123 Sreet",
"City": "City",
"Region": "AB",
"Country": "CA",
"Postcode": "X0X0X0",
"Phone": "4031234567"
}
},
"ShippingDetails": {
"ShippingAmount": 0.00,
"DutyAmount": 0.00,
"Name": "First Last",
"Email": "[email protected]",
"Phone": "4031231234",
"Address": {
"Street": "123 Sreet",
"City": "City",
"Region": "AB",
"Country": "CA",
"Postcode": "X0X0X0"
}
},
"AutoCapture": false,
"CompleteUrl": "https://www.send-user-here-after-success-redirect.com",
"CancelUrl": "https://www.send-user-here-after-failed-redirect.com"
}
Response Example
#Headers
Content-Type: application/json
#Body
{
"SessionId": "91b64778-0d37-479c-ae9f-32f6685ac6ea",
"State": "CREATED",
"MerchantReference": "unique_reference_provided_by_merchant",
"Items": [
{
"Name": "Item 1",
"Amount": 10.00,
"Quantity": 1
},
{
"Name": "Item 2",
"Amount": 12.00,
"Quantity": 2
}
],
"Currency": "USD",
"TotalAmount": 34.00,
"BillingProfile": {
"Name": "First Last",
"Email": "[email protected]",
"Address": {
"Street": "123 Sreet",
"City": "City",
"Region": "AB",
"Country": "CA",
"Postcode": "X0X0X0",
"Phone": "4031234567"
}
},
"ShippingDetails": {
"ShippingAmount": 0.00,
"DutyAmount": 0.00,
"Name": "First Last",
"Email": "[email protected]",
"Phone": "4031231234",
"Address": {
"Street": "123 Sreet",
"City": "City",
"Region": "AB",
"Country": "CA",
"Postcode": "X0X0X0"
}
},
"AutoCapture": false,
"CompleteUrl": "https://www.send-user-here-after-success-redirect.com",
"CancelUrl": "https://www.send-user-here-after-failed-redirect.com"
}
Step 2 - Instantiate the Drop-In
To instantiate the most basic version of the Reach Drop-In, there are four main components:
- Add an HTML container element to your page to hold the Drop-In
- Create a JavaScript method to complete logic once the Drop-In is successful
- Create a JavaScript method to handle failure cases if payment is not successful
- Add “Reach Drop-In” (rch.js) script to your page
- Call the Reach
init()
method and pass in an object with atarget
,id
andonSuccess
property.
View the Drop-In Javascript Library (rch.js) Guide for more detailed information about the rch.js.
Putting this all together your page should look something like this:
<!DOCTYPE html>
<html lang="en">
<head>
...
...
<script defer src="https://asset.withreach.com/dist/rch.js" onload="init()"></script>
<script>
function onSuccess() {
<!-- Perform any actions after the Drop-In is completed (i.e. redirect to success URL). -->
window.location.replace("/success/");
}
function onFailure(error) {
<!-- Perform any actions to handle payment failure. -->
document.querySelector("#message").innerHTML =
"Oops! Something went wrong. More information: " + error.errorCode +
", " + error.errorMessage + " Please review your information.";
}
function init() {
<!-- 91b64778-0d37-479c-ae9f-32f6685ac6ea is the session ID -->
RCH_CC.rchInit({target:"#rch-dropin",id:"91b64778-0d37-479c-ae9f-32f6685ac6ea", onSuccess, onFailure});
}
</script>
...
...
</head>
<body>
...
...
<div id=”rch-dropin”></div>
...
...
</body>
</html>
The onSuccess
method passed into the init method is used to indicate that the payment has been successfully initiated and the shopper can now be directed to the success page.
NOTE
The
onSuccess
method does not indicate that the payment was completed only that the payment process has been successfully initiated. The payment is not complete until you’ve receive theORDER_PROCESSED
notification.
The onFailure
method passed into the init method is called when an error that is unrecoverable inside the session is encountered. The error code and message will be passed into onFailure
and can be used to determine which action to take. For example, a message could be displayed to the end-user indicating what failed.
Step 3 - Receive Notifications (PaymentAuthorized Order)
The Drop-In will send notifications to you when actions are taken against a Session or Order. In order to receive these notifications, you will need to configure your server to listen for them by creating an endpoint at the webhook URL provided to Reach during onboarding. See the Notifications Guide for more details.
You will receive a SESSION_COMPLETED
and ORDER_AUTHORIZED
notification once the user has submitted their payment. Once the ORDER_AUTHORIZED
notification is received you can mark the Order as ready to be captured in your system.
NOTE
The
SESSION_COMPLETED
is an informational notification that simply indicates the user has completed their interaction with the Drop-In. It should be logged but not actioned on.
The ORDER_AUTHORIZED
notification will look like:
{
"EventType": "ORDER_AUTHORIZED",
"Order": {
"OrderId": "cc7236aa-d11b-436c-a29c-d26cecadc847",
"State": "PAYMENT_AUTHORIZED",
"MerchantReference": "unique_reference_provided_by_merchant",
"SessionId": "91b64778-0d37-479c-ae9f-32f6685ac6ea"
}
}
Upon successfully receiving a notification you should respond with HTTP status 200. If you reply with a status outside that range, we will resend the notification at a later time. See the Notifications Guide for more details.
Step 4 - Capture Order
When you are ready to Capture the Order, send an HTTP POST to the Order API. You will need the OrderId
either from within the ORDER_AUTHORIZED
notification or by looking up the Session via an API call to get the embedded OrderId
(Session.Order.OrderId
).
See the Reach Order API Reference for a more in depth view of the Capture Order request.
Request Example
#Location
POST https://api.withreach.com/v1/order/{OrderId}/capture
#Headers
Authorization: Basic YWNjb3VudDpzZWNyZXQ=
#Body
<empty>
Response Example
#Headers
Content-Type: application/json
#Body
{
"OrderId": "cc7236aa-d11b-436c-a29c-d26cecadc847",
"State": "PROCESSED",
"MerchantReference": "1234567890",
"SessionId": "91b64778-0d37-479c-ae9f-32f6685ac6ea",
"Reason": {
"Code": "Captured",
"Retryable": false
}
}
There are three different successful responses you can receive from the Capture Order request:
- Captured: The Order was successfully captured.
- PendingNotification: The Order capture attempt was successful. Completion of the capture is pending due to our 3rd party processor, and you will be notified once completed.
- UnderReview: The Order capture attempt was successful. Completion of the capture is pending an internal review being done by Reach’s team, and you will be notified once completed.
See the Reach Order API Reference for a more in depth view of the Capture Order response.
Step 5 - Receive Notifications (Processed Order)
Not all capture Order requests will be synchronous. If this was the case for your capture Order request, you will need to wait for the ORDER_PROCESSED
notification to mark your Order as complete/captured.
The ORDER_PROCESSED
notification will look like:
{
"EventType": "ORDER_PROCESSED",
"Order": {
"OrderId": "cc7236aa-d11b-436c-a29c-d26cecadc847",
"State": "PROCESSED",
"MerchantReference": "unique_reference_provided_by_merchant",
"SessionId": "91b64778-0d37-479c-ae9f-32f6685ac6ea"
}
}
Upon successfully receiving a notification you should respond with HTTP status 200. If you reply with a status outside that range, we will resend the notification at a later time. See the Notifications Guide for more details.
Refunds
Refunds can be completed using the Reach Admin Panel. See our Admin Page for more info. Refunds can also be managed from the Order API.
Customization & Style
The Reach Drop-In offers extensive visual customization, through the modification of colors, borders, and fonts, enabling you can easily match the design of your site.
Sample Themes
Standard
{
"--color-primary": "rgb(9, 142, 199)",
"--accordion--border-color": "#212121",
"--accordion--border-radius": "0",
"--accordion--border-top-width": "0px",
"--accordion--border-right-width": "0px",
"--accordion--border-bottom-width": "1px",
"--accordion--border-left-width": "0px",
"--input--border-color": "rgb(9, 142, 199)",
"--input--border-radius": "0",
"--input--border-top-width": "0px",
"--input--border-right-width": "0px",
"--input--border-bottom-width": "2px",
"--input--border-left-width": "0px"
}
Gray
{
"--color-primary": "rgb(51, 51, 51)",
"--accordion--border-color": "#212121",
"--accordion--border-radius": 0,
"--accordion--border-top-width": "0px",
"--accordion--border-right-width": "0px",
"--accordion--border-bottom-width": "1px",
"--accordion--border-left-width": "0px",
"--button--border-radius": 0,
"--input--border-radius": 0
}
Lavender
{
"--color-primary": "rgb(132, 0, 255)",
"--color-hover": "#8447c3",
"--color-content": "#f1edfb",
"--accordion--border-color": "#d6baf3",
"--accordion--border-radius": "0",
"--accordion--border-top-width": "0px",
"--accordion--border-right-width": "0px",
"--accordion--border-bottom-width": "1px",
"--accordion--border-left-width": "0px"
}
Dark
{
"--font-color": "#bcbdbe",
"--reach-badge--color": "dark",
"--color-app": "#272727",
"--color-header": "#1a1a1a",
"--color-content": "#0d0d0d",
"--accordion--border-color": "#7f7f7f",
"--accordion--border-radius": 0,
"--accordion--border-top-width": "0px",
"--accordion--border-right-width": "0px",
"--accordion--border-bottom-width": "0px",
"--accordion--border-left-width": "0px",
"--input--border-color": "#333333",
"--input--font-color": "#bcbdbe",
"--input--background-color": "black",
"--button--border-radius": 0
}
Payment Button Guide
By default the ‘Complete payment’ submit button resides within the Drop-In iframe and includes its own internal logic to determine when the payment can be submitted.
Host your own submit payment button
If you would prefer to host your own external (outside the Drop-In iframe) button for submitting the payment, you can hide the iframes internal submit button by using the hideSubmitButton
flag, then control the enabled/disabled state of your own button by utilizing the onSubmitEnabledChange
.
RCH_CC.rchInit will return an object that will be available for calling the submitPayment
method. Calling this method invokes the same action as clicking the submit button internal to the iframe. This will allow the parent page to host its own control for submitting the payment.
NOTE: The submitPayment method will not do additional checks to determine if payment can be sent, that should be determined before request is sent.
External Submit Example
// reference button in dom
const btn = document.querySelector("#submit-btn");
btn.disabled = true;
// function will execute when the value changes. The value is the only parameter
const onSubmitEnabledChange = function (state) {
btn.disabled = !state;
};
// initialize with the internal submit button hidden
const rchInstance = RCH_CC.rchInit({
target,
id,
onSuccess,
hideSubmitButton: true,
onSubmitEnabledChange,
locale: "en_US",
});
// assign click event listener
btn.addEventListener("click", () => {
// call method on instance
rchInstance.submitPayment();
});
Un-select Payment Method
If an external submit button is used on the parent page, it may be beneficial to un-select a payment selection made in the Drop-In in order to select a payment alternative.
This function is enabled by unselectPaymentMethod
method available on the instance.
Un-Select Example
Order States
Both the Drop-in Session and Order have their own states that they move though during the lifecycle of a transaction.
Notifications
Notification events are sent to merchants via asynchronous HTTP POST requests in order to synchronize the merchant's payment information with Reach's information. Technical information around notification structure can be found in the Drop-in API Notifications Guide.
Updated 7 months ago